This guide is about strategically placing your buildings in a way that generates as much value as possible as a human player in Warcraft 3. It’s important to note here that there’s no consensus on what’s optimal when it comes to base building. Every individual player has their own style and preferences. The intention of this guide is to provide examples to consider, and talk about some of the underlying trade offs behind each decision for human base building and layout.
Guide overview
Walling in Your Main Base
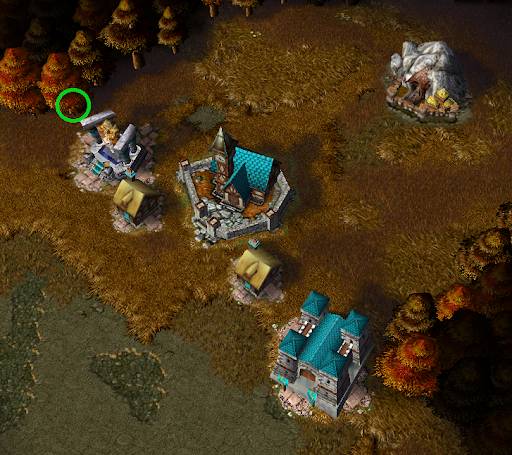
If you’re a beginner or just someone looking for a one-size-fits-all way to wall your base then this is for you. The following wall is decent on all maps and in all matchups.
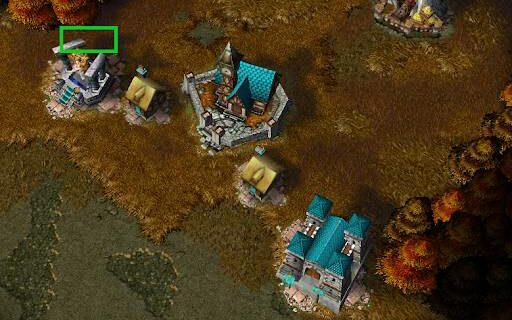
Use your Altar, Barracks, and two Farms to wall in your main base, leaving a small gap on one side (shown in green). This wall forces enemy heroes to pass through the small gap to enter your base. If they pass through the gap you can block it with a unit, trapping your opponent in your base.
Even though this wall is very basic, there are still some interesting choices to consider:
- Which side do you build your Altar, and which side do you build your Barracks? You want to build your Altar on the side that is closer to the first camp you’re going to creep. This way your hero spawns closer to the camp, which gets you creeping as soon as possible.
- Which side of the wall do you leave open? The short answer is that you want to close the more dangerous side, and open the safer side. It depends on the map and your strategy, but one guideline is to close the side your opponent is most likely to attack from, and open the other. Another guideline is to open the side closest to your expansion, since you want to control the space between your bases and thus it’s more likely to be safer.
- How far forward do you build the wall? In the above example we built the wall as far forward as possible, claiming as much space inside our base as we could. In general this is a good idea. This gives you more space for more buildings inside your base, like towers and production buildings. The tradeoff is by placing your buildings far forward they’re harder to defend, but most structures are quite durable so this tradeoff is usually worth it.
Pathing Buffer and Unit Collision
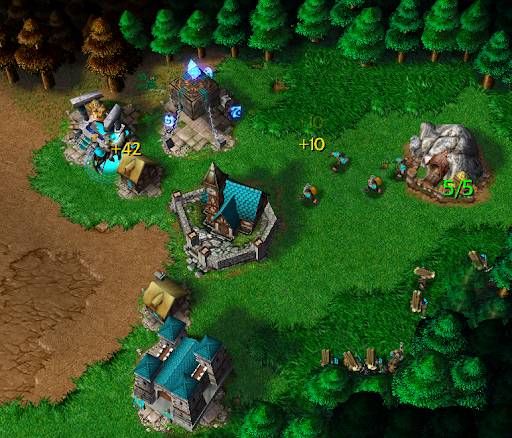
The whole reason to wall in your base is to prevent units from getting in. It turns out that some buildings do a better job of this than others. Consider the following example:
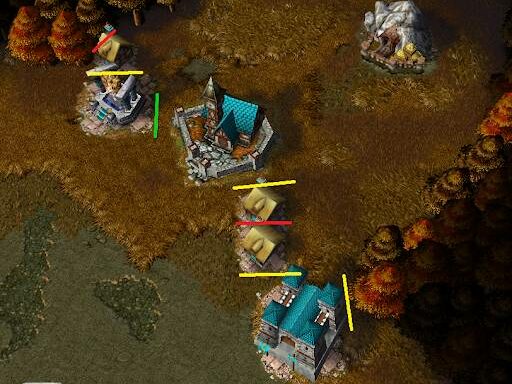
The coloured lines mean the following:
- Red: Gap size of 0. This is a tight wall. Not even the smallest units can pass through.
- Yellow: Gap size of 1. Small units can pass through here (e.g. workers, footmen, ghouls, skeletons, spirit wolves).
- Green: Gap size of 2. All units can pass through.
Note that all the buildings are placed directly next to one another, with no spaces, so why are there different gap sizes? The answer is that some buildings have a pathing buffer zone around their edge which leaves space for units. In the above example the Altar, Town Hall, and Barracks are buildings with pathing buffers. Farms don’t have one. One helpful way to visualize this is with a simple grid (credit to https://liquipedia.net/warcraft/), for example the Barracks and Farm can be described with the following images:


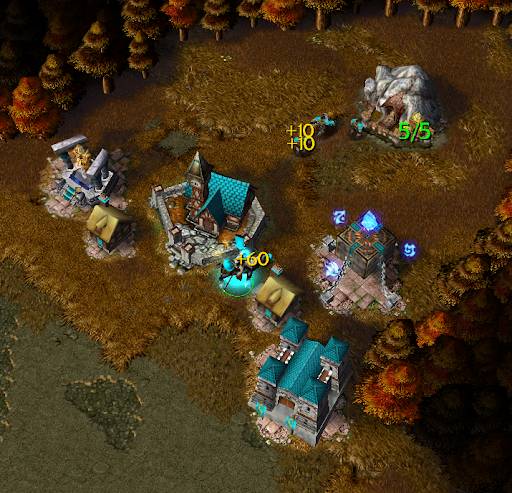
That’s why the two farms next to one another form a tight wall: Farms don’t have any reserved space for pathing at their edge. Similarly trees don’t have any pathing space, so a farm next to a tree is a tight wall.
The Barracks does have a one-unit buffer around it, which means even when we place it next to a tree or farm there’s still a small gap, big enough for small units to pass through.
And this is why the Altar and Town Hall have a two-unit gap between them, even though they’re placed next to one another: Both of these buildings have a one-unit pathing buffer around them, so when they’re next to one another those zones combine to create a two-unit gap, which is enough for even the largest units to fit through.
This may all sound complicated and random, but there’s a simple way to remember which buildings have the one-unit pathing buffer around them: All buildings that produce ground units have it. So that includes your Altar, and every production building except the Gryphon Aviary. The one special-case building is the Arcane Vault, which also has the pathing buffer, presumably to allow easier access for heroes to buy items.
If you want more information on which units can fit in the small gap, check this section in Liquipedia. Anything with a collision size of 31 or less can fit.
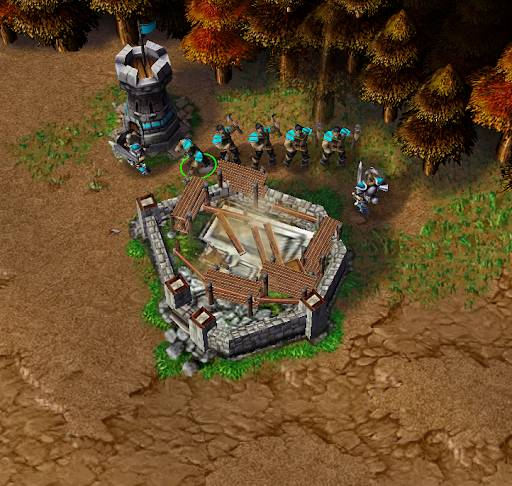
Full Wall In
This is a variation on the first wall we covered.

Note that there isn’t any gap between the altar and trees this time. In fact there aren’t any two-unit gaps anywhere in this wall, which means the main base is fully walled off from everything except small units.
The strength of this wall is that it fully blocks all heroes and most units from entering your base, making it much more secure. That trait is also this wall’s biggest weakness though: It’s pretty easy for your own heroes and units to get stuck on the wrong side of the wall, forcing you to destroy a building or chop down trees to create an opening.
One way your units can end up on the wrong side of the wall is if they spawn there. For big units like heroes, knights, or riflemen, this will trap them on the wrong side of the wall. The solution to this is to carefully manage the rally points on your production buildings. Units always spawn from one of the four corners of their production building, specifically the corner closest to the building’s rally point. So what you want to do is set the rally point close to the corner that you want the units to spawn at. For example in the above image the rally point of the Altar is set to the outside corner, so our hero will spawn outside the wall.
Another way you can get stuck inside your base is to Town Portal there. For example if you double click a Scroll of Town Portal to activate it, you will always arrive at the bottom right corner of your Town Hall. Depending on your wall that might be okay, but our wall above it would result in our units getting stuck inside our base.
Your wall can also work against you the other way: It can stop you from getting inside your base when you need to. For example if your hero is low health and being chased, you won’t be able to retreat inside your base. Another example of this is if the enemy uses air units or a Goblin Zeppelin to get inside your wall, you can be trapped outside your base and unable to defend.
It might sound like there are too many negatives to make closed bases worth considering, but the extra defense it provides is often worth it. There’s also a trick that can help mitigate the downsides, which I’ll explain later in the One Punch Tree section near the end of the guide.
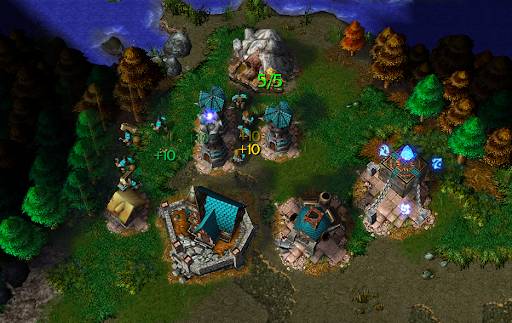
Filling Out Your Base
In this section we’ll talk about adding all the other buildings to your base. Here’s a reasonable starting point:
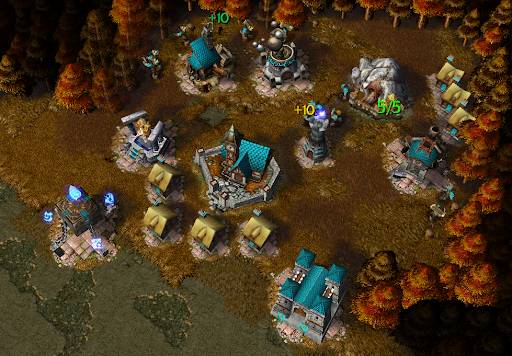
Generally you want to place expensive buildings like Arcane Sanctums behind your wall to protect them. You also want to construct buildings inside your wall if you’re worried about them being canceled while under construction. For example the Blacksmith is a relatively inexpensive building that is also quite durable, so it seems low priority to dedicate space to it inside your base. However the Blacksmith is vulnerable while under construction, so if you’re doing a one base Riflemen build you would generally still build the Blacksmith inside your base because if the enemy cancels it it will delay your push timing a lot.
There’s only so much room inside your base, so some structures will have to go on the outside. The most common choice is to place your Arcane Vault on the outside, since it’s cheap and thus less painful to replace if lost, and also it’s nice to have it out front for easier access to items.
Even if you have lots of space inside your base you can still justify placing buildings outside your wall, depending on the situation. Keeping the inside of your base clean makes it easier to move around and defend air pressure and zeppelin drops.
When building Farms, it’s often worth placing some on the outer edge of your Town Hall. This has a couple benefits:
- Gives your Town Hall an extra layer of protection from melee units, which makes it harder for your opponent to burst it down. This is especially useful against Orc players making a lot of Raiders.
- Ensures Staff of Preservation will place units safely on the inside of your wall. Staff of Preservation teleports the target unit to a random location next to your Town Hall, but if you block off all the outside space with farms the unit will always be teleported to a spot inside your wall.
I also like to build farms on the back side of my gold mine to keep them out of the way. Alternatively you can build them in the area you’re harvesting lumber. This is a little bit more economical since the peasant won’t have to waste time walking to/from the farm location, and instead just builds it next to where he’s chopping wood. It can be a waste of space though, and might bite you later if you need to build something else inside your base and have a bunch of random farms in the way.
A note about Arcane Sanctums: They can be placed inside your wall even if it’s a full-wall. This is because all three of the units they produce (i.e. Priests, Sorceresses, and Spell Breakers) have small collision sizes, so you don’t have to worry about them ever getting stuck in your base.
As for tower placement, it’s situational. The tower placement in the example above is generally good because it’s protecting your gold peasants, which are the most likely to be harassed. Sometimes it makes sense to build your tower farther forward though, for example against something like a Bloodmage using Flamestrike to hit your gold peasants, you’d be better off building the tower further forward, even on the outside of your wall, to get more hits onto the enemy hero when it moves in to harass your workers.
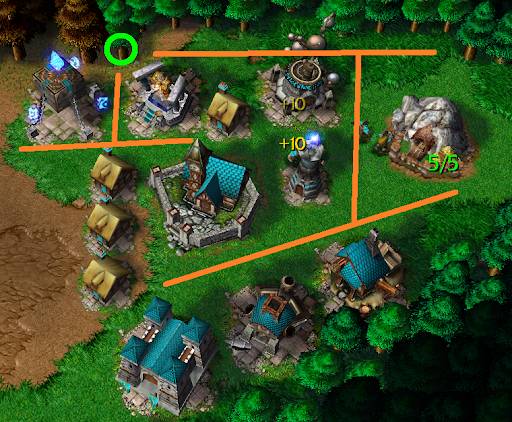
Expansion Layout
As a starting point, consider the following game state in a Human vs Undead game, two base vs one:
In situations like this where you’ve invested into an expansion, your opponent should have a stronger standing army than you and win any fights out in the open. The safest place on the map for you is in one of your bases. The second safest place is in the area between your main and expansion, because you have access to either base and can flank with militia. With this in mind, we want to concentrate our defenses on the outer edges of our main and expansion, and put vulnerable buildings on the inner edges where they’ll be safest. So something like this is reasonable for our expansion layout:
The Town Hall is initially placed next to the trees to maximize our lumber income. The shop is a vulnerable building, so it’s placed on the side closer to your main base. This shop placement also means our heroes have minimal exposure when buying items. The towers are concentrated around the peasants mining gold, and are far enough back from the wall so the enemy can’t easily target them with Crypt Fiends.
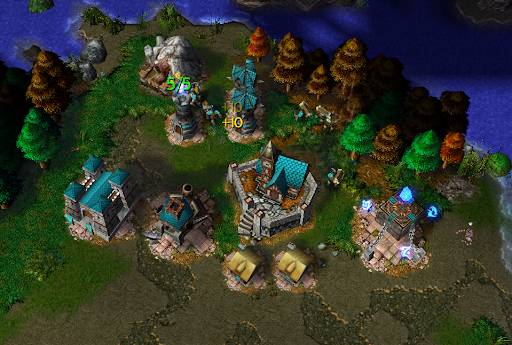
You can also build the Town Hall on the side closer to your main base, but then it becomes risky to use the Arcane Vault to complete your wall, since that would put it on the exposed side of your expansion. For this reason this layout is better if you’re planning to build a second barracks and can use it in the wall.
Bonus Tip #1: Peasant Bouncer
One cute trick you can do to protect your peasants while you build an expansion is to wedge them between the expansion and the tree line.
In the above example the footmen are blocking the only access points to the peasants, so they can’t be attacked by melee threats. Even without the footmen it still cuts down on how many melee attackers can do damage to your peasants at once. There are some downsides to this technique though:
- It can be difficult to get the peasants into position. You need to spend some extra time and attention to move them one-by-one to get them tightly packed.
- Your peasants can’t easily escape if a threat gets in. For example if an Undead player gets a skeleton into a position like where the footmen are above, the peasant being attacked is trapped in there with nowhere to run. On top of that the skeleton can be hard to kill because it can be hard to get surface area for multiple footmen to hit it.
- If the enemy has ranged damage threats (e.g. ranged hero, archers) this position won’t protect your peasants much, and it will just make it harder for you to run your peasants away as they’re targeted.
- Keeper of the Grove’s treants can be summoned from the trees behind your peasants, so don’t do this vs Keeper.
Bonus Tip #2: One Punch Tree
The disadvantage of a closed base is that your units can get stuck on the wrong side of the wall. The solution to this is to make it easy to open your base, so that when a situation comes up where your wall is working against you it’s easy to quickly open your base. My suggested way to do this is:
- Build your base in a way such that chopping down a single tree would open it, and
- Preemptively chop that tree to the point where it only has one hit remaining before it would fall down.
So for example we could modify our closed base layout from earlier. Bringing the Altar back a bit creates a wall where chopping down a single tree would open the base.
To chop the tree to one hit, consider the following: Trees have 50 health. Each time a peasant chops a tree it does one damage. So our goal is to chop this tree exactly 49 times. A peasant carries 10 lumber per trip, so we need to do one trip of 9 lumber, and then 4 full trips of 10 lumber each. We can do this with the following actions:
- Select a peasant that isn’t carrying any wood
- Chop any other tree once
- Right click the target tree
- Press and hold shift
- Press the return cargo hotkey
- Repeat the following 4 times:
- Right click the target tree
- Press the return cargo hotkey
- Issue a move command in front of the tree you want to chop after you’re done (NOTE: this is necessary for some reason to prevent the peasant from returning to the original tree after chopping 10 lumber from the new tree)
- Right click that new tree
- Stop holding shift
It sounds complicated but if you practice it for a minute you should be able to issue all the queued commands in under two seconds. Plus before your hero comes out there’s not much else to do anyway.
Now whenever you need to open up your base just go give that tree a chop and it will instantly come down.
Bonus Tip #3: Selling Items Over A Wall
One reason many players are reluctant to place their shop on the inside of their wall is because they think it would prevent them from being able to sell items. It turns out though that you can still sell items to a shop over the wall. For example this base has a full wall but you can still sell items to the shop.
This seems to work whenever the distance between the hero and shop is less than or equal to the size of a Farm.
This is a good thing to know for situations where you’re under pressure and can’t get a shop up in front of your base, or if your shop is really important to your strategy and you want to give it some extra protection.
Bonus Tip #4: Water Elemental Trap
In Human mirror it’s common for your enemy to try to attack your peasants by summoning a Water Elemental over your wall. If you create a double farm layer in your wall then the Water Elementals will get trapped in between the farms instead of coming into your base.
This technique is a bit of a gimmick though. The enemy can summon Water Elementals over any building, not just farms. Not every Human player knows that though, so many players may fall for this trap. I’ve seen Chaemiko use this technique and he’s one of the best players in the world, so it’s not just a low-level gimmick.
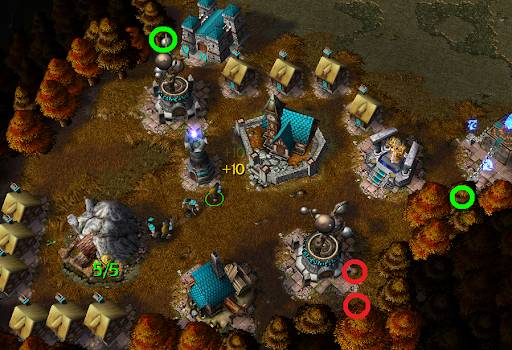
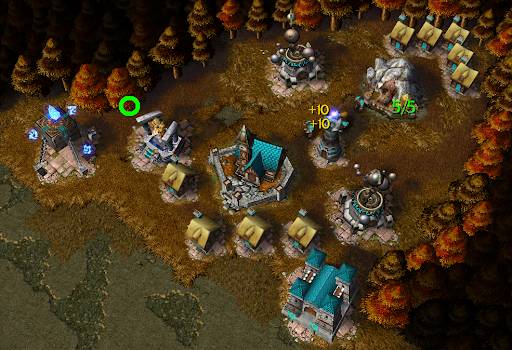
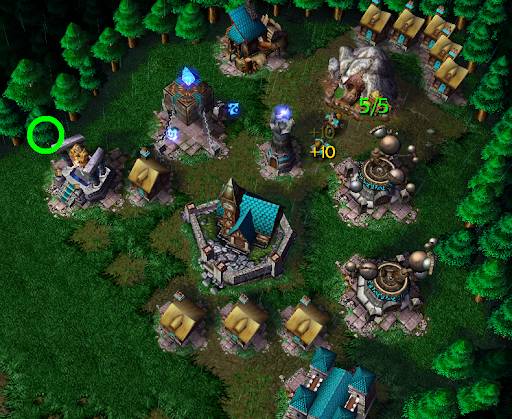
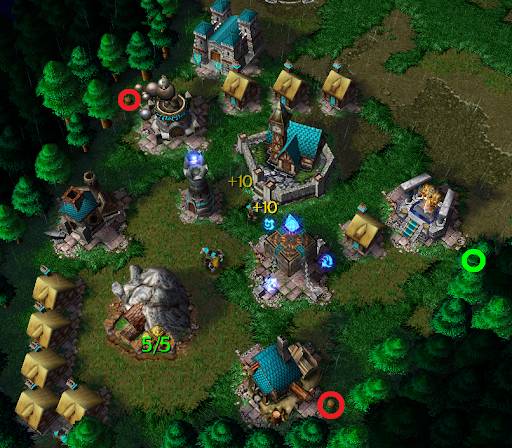
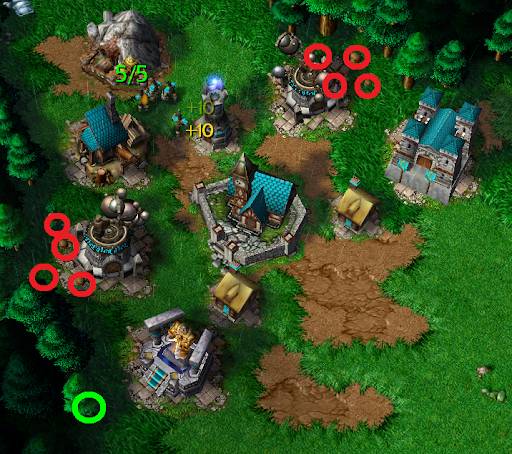
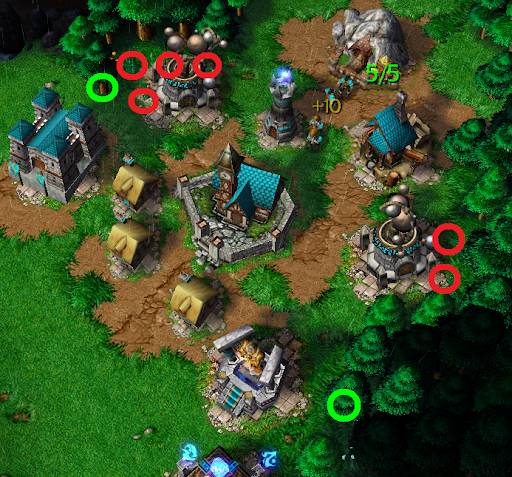
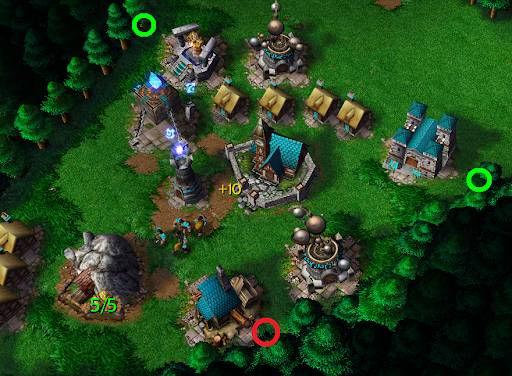
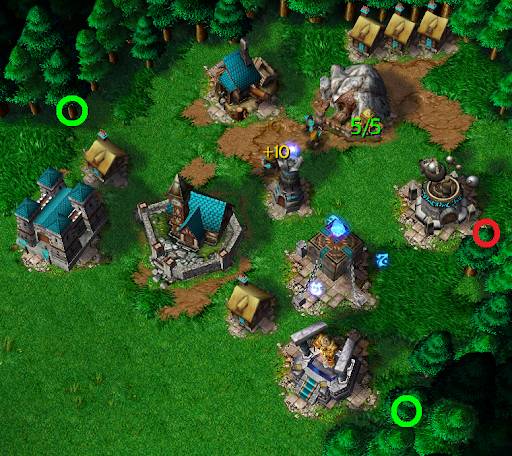
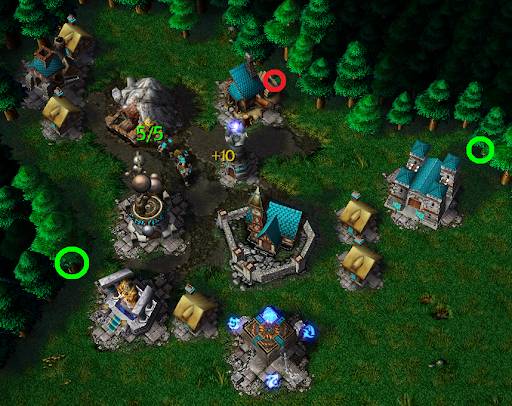
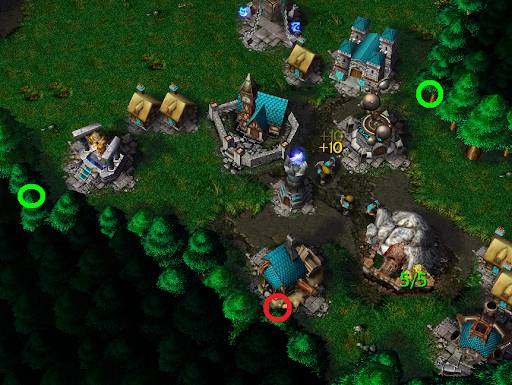
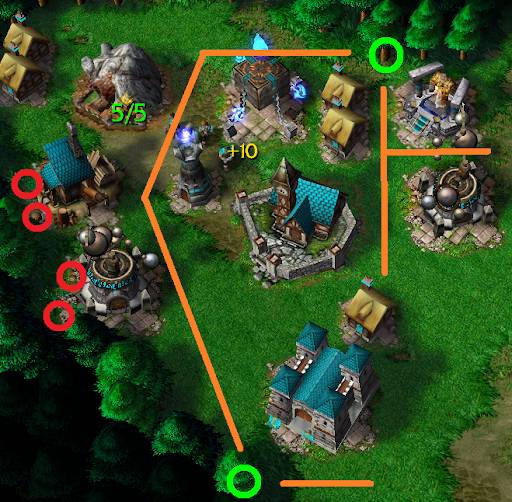
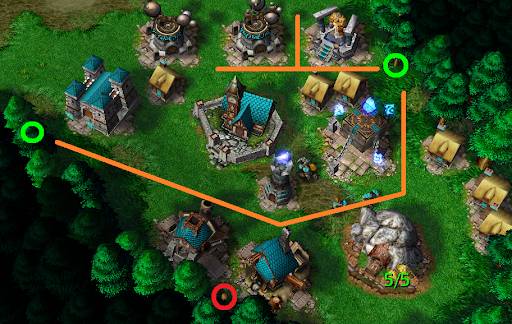
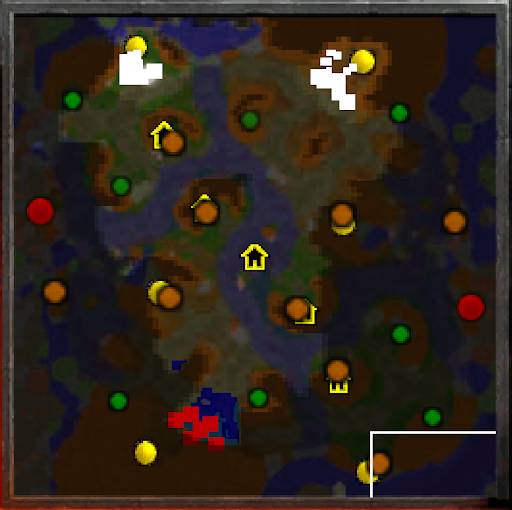
Example Gallery
Here are some example base layouts on some of the current maps. Some notes about these images:
- These are just examples, I’m not suggesting they’re optimal or universal. There are lots of ways to build a base, all with their own advantages and disadvantages.
- If you’re looking for a simple one-size-fits-all wall that works on every map and every matchup, use the one from earlier, in the Walling In Your Main Base section at the start of the guide.
- All bases shown below are full walls.
- Any Arcane Vaults shown on the inside of the wall can be sold to from outside the wall.
- All the examples shown have valid pathing from one side of the base to the other.
- Markup legend:
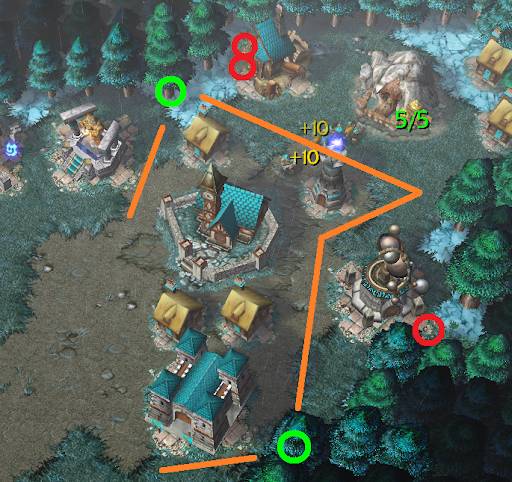
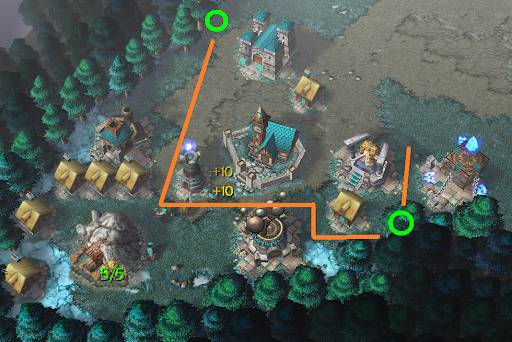
- Green: Tree to cut down if you need to open your base.
- Red: Trees that were cut down to make room for buildings.
- Orange: Pathing highlight. I’m only going to use this when I think the layout isn’t clear on pathing, because it tends to clutter the image.
Base layout examples