This guide is about how to play the Human vs Human match up in Warcraft 3, with a focus on the most common meta strategy: one base archmage footmen into priest spellbreaker.
The start of this guide is a quick build order that that can help beginner players just starting out with human. The rest of the guide details how you should progress through the early, mid, and late game, and how to respond to different common strategies you might see.
Guide overview
The Build
Early Game
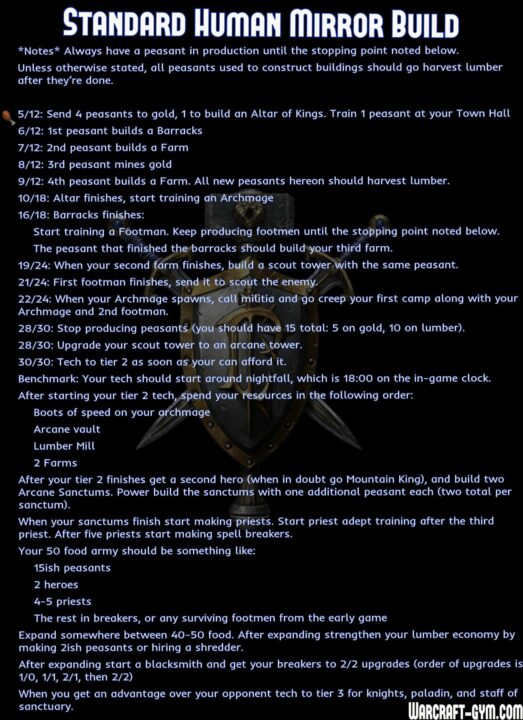
The standard way to play the early game is to creep level 3 as quickly and efficiently as possible and then go pressure your opponent. The creep route depends on the map, so I won’t detail them all here. Many level 3 creep routes can be found at: https://warcraft-gym.com/learn-warcraft-3/warcraft-3-creep-routes/
The above style of creeping level 3 is the most common way to play mirror, but there’s another option that is also fairly common: creep one small camp and then go attack your opponent. With this style you’d typically stay at 8 lumber peasants and delay your arcane tower until after you start your tech. If you prefer controlling play through aggression then this style may be better suited to you. The downside is that you typically have a small hero experience and item disadvantage. At the end of this guide there will be links to example games where you can see both styles in action.
When to Fight: It’s All About The Water Elementals
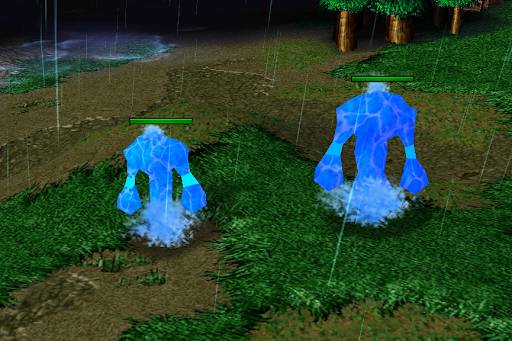
Early game fights in human mirror can be quite snowbally, so you want to make sure you’re only taking fights where you have an advantage. The easiest way to tell if you have an advantage in a fight is to look at the water elementals. Level 2 water elementals do almost twice as much damage as level 1 elementals, so if you have a level 3 archmage and your opponent is only level 2, then you should look to fight. Also pay attention to the number of water elementals. If your opponent has an extra water elemental out, then you should not fight. Focusing on the hero levels and number of water elementals is a good starting point for judging relative army strength in the early game. Try to avoid fights where you have a water elemental disadvantage, either in level or numbers.
One nice property of human mirror is that it’s easy to run from a fight if it doesn’t look favorable. In other matchups there are crowd-control spells like entangling roots and frost nova, which stun/slow your units allowing the opponent to pick them off if you’re caught out of position or try to run. The early game of human mirror doesn’t have any crowd control or damaging ability though (assuming it’s archmage vs archmage), so if you don’t want to fight you can just run away without much consequence. Wait for your moment patiently. Look for fights where you have a clear advantage, and run from fights where you’re at a disadvantage.
Picking Targets
In early game fights you generally want to focus fire the most exposed target. Usually this means focusing the opponent’s footmen one at a time, since they’re on the front line. However, fights often get chaotic, and when that happens the armies get jumbled together which exposes the opponent’s ranged units. In these situations you should prioritize targets in this order: (1) troll mercenaries (more on mercenaries later), (2) opponent’s archmage, (3) water elementals, (4) footmen.
A Note on Footmen
The build order at the top of this guide suggests stopping footmen production at 30 food, which is 5 footmen total. This is more of a minimum rather than a fixed limit. It’s okay to make more footmen because they are good against spell breakers, so they retain their value into the midgame. So if you ever find yourself with extra gold don’t be afraid to make extra footmen. For example if you lose some of your lumber peasants in the early game then you’ll have extra gold compared to lumber, so making a few footmen can be a good idea.
Base Trades
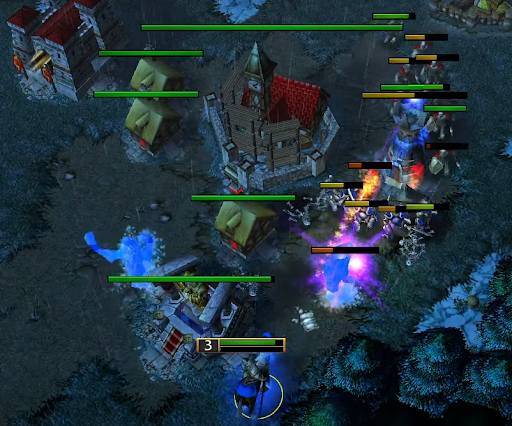
A common occurrence in human mirror is for both players to show up at one another’s base around the same time and try to kill one another’s workers. It’s a difficult situation because it tests your multitasking, and can lead the game into a weird state where both players have crippled economies, which can be confusing to navigate. The main thing you want to avoid on the offensive side is fighting into a large swarm of militia. Similarly, your goal on the defensive side is to stay close to your arcane tower and use large groups of militia to fight all at once.
Mid Game

The midgame starts when you have your second hero and sanctum units. You’ll want to focus on creeping your second hero and establishing an expansion. If your opponent is aggressive and you went Mountain King second then call militia to gain an advantage in the fight, and use storm bolt to pick off units as your opponent tries to run. By the same token you should avoid being aggressive early on in the midgame or your opponent could do the same militia + storm bolt combo to punish you. So generally you should creep on your half of the map during this phase. I would recommend you mostly go MK second, but there are lots of options for second heroes in human mirror:
- Mountain King: The standard and most common pick. When in doubt, go MK. Storm bolt is incredibly powerful for picking off units and threatening heroes, and bash is strong against spell breakers. He also scales well if the game goes late.
- Pandaren Brewmaster: He’s a tavern hero, which means he doesn’t have any training time. This makes the panda a strong tempo pick. If the opponent expands early and you prevent them from getting any towers up, then going panda second is a great play. Breath of fire is strong against footmen and militia, so you can keep pushing into the expansion. Panda second is also very strong if your opponent goes tier 3, because breath of fire is such a strong AoE spell. It’s also particularly amazing against flying machines, which are the counter to gryphons, so if you can get to gryphons then your panda will pay off big time because the opponent will struggle to get value from flying machines. The downside of the panda is that he is not particularly strong in breaker vs breaker battles, which are the standard way mirror is played.
- Pitlord: Extremely strong against spell breakers. If you find lots of +damage items in the early game then pitlord second can be strong because you can immediately stack up his cleave damage.
- Blood Mage: A common pick when the opponent establishes a tier 1 expansion and safely gets some towers up. Going bloodmage second is a strong option because flamestrike is such a powerful siege tool: it zones peasants off of repairing towers, and also does big damage to towers.
When your sanctums finish you generally want to make priests first before switching to breakers. This is because the priests are fantastic support units and can heal your footmen frontline. However, if the early game is bloody and both players have lost most or all of their footmen, then you should make a few breakers first or remake some footmen, so that you have a frontline to heal, before you make priests.
When To Expand
There’s no precise time to expand, but generally if you’re ahead or the game is even then expand as soon as you can afford it (after your second hero and two arcane sanctums). If you’re behind after the early game then a common play is to get a blacksmith and upgrade your spell breakers so you can have an efficient 50 food army. Then, assuming your opponent expanded, you can pressure their expansion while counter expanding. Applying pressure will create space for your own expansion to finish.
Midgame Target Priority
In early midgame skirmishes (approximately when players have 40 food) you should use storm bolt to kill the opponent’s priests, since they’re very fragile. You want to avoid focusing heroes during this phase of the game because the armies are small and there isn’t enough damage to reliably threaten them. But if your opponent is out of position and exposes one of their heroes then by all means go for some bolt focus fire. In general though prioritize priests and footmen over heroes in the early mid game.
Once armies get larger than 50 food then the focus shifts more to bolt focusing heroes. This is particularly valuable because spell breakers burn mana on their target, so you can burn down the opponent’s hero’s mana pool by focusing it. Again though the main priority is to select targets of opportunity, so don’t dive through a line of spell breakers to target a hero, instead attack what is most exposed, and if a hero is equally exposed then prioritize it over the opponent’s spell breakers.
Transitioning to Late Game
You can go all the way to 80 food of breaker priest if you like, but eventually you’ll want to transition to tier 3. If you’re not sure when to do it, then use the following guidelines:
- If you’re at 80 food, then tech to tier 3. Adding more breaker priest is going to have minimal value compared to adding late game tech.
- If you’re 60+ food and have an advantage in the game then go tier 3. Teching up is the safest way to secure a win, instead of trying to push into enemy territory where you can get punished by militia.
Late Game
At tier 3 the standard play is to get a Paladin as your third hero, go knights, staff of sanctuary, and priest master training. Knights are extremely strong against spell breakers, and quite often end the game if your opponent is still on tier 2.
If you notice your opponent transitioning to tier 3 then you can follow them and also go knights, or go gryphons to preemptively counter the knights. If your opponent goes gryphons then the standard response is to make flying machines.
A Note on Mercenary Camps
On maps with mercenary camps (e.g. Last Refuge, Echo Isles) the meta play is to militia creep the mercenary camp first, hire a shadow priest at 22 food, then make a 4th farm after clearing the camp, creep a couple more camps for level 3, and hire the berserker and a second shadow priest as they become available from the mercenary camp.
It is very common for players to tier 1 expand on these maps because the mercenaries provide extra safety for your vulnerable expansion. You can still play one base though, if you want. Expanding won’t be covered in this guide but if you want to learn it then mercenary camp maps are the place to start. I’ll link an example game at the end of the guide showing a game where both players hire mercenaries, and one expands. Also note that researching Defend is also very common on these maps due to the extra threat of piercing damage from the mercenaries.
Other Strategies
Not everyone plays archmage footmen, tech to tier 2, double sanctum and expand. That’s the most common way to play human mirror, but not the only way. I’ll give some quick advice on how you can adapt to other common strategies. One nice thing about mirror is that if you encounter something new, you can always try it yourself and get a feel for the strengths and weaknesses.
One Base Tier 3
If the opponent goes straight to tier 3 then you should try to expand like normal. Most likely the opponent will go knight/priest/mortar, against which you want to get sorceresses and use slow to kite the enemy army. You can also retrain to AoE spells (blizzard and thunder clap) which can dish out a lot of damage against knight/priest/mortar. You eventually want to go tier 3 yourself, otherwise the tier 3 army will slowly break through your tier 2 army.
Another option against one base tier 3 is to abandon the idea of expanding and just follow them to tier 3 and go knights yourself. Even if your tech is slower and you made an extra arcane sanctum it’s not the end of the world.
Defending Zeppelin Harass
Human peasants are quite vulnerable to zeppelin harass. Mirror is no different from any other matchup in this regard. The safest response to a zeppelin is to get a workshop and make a flying machine to kill it. This can be quite expensive and take a long time though, especially if you don’t have a blacksmith yet. Another option is get a zeppelin of your own to track the movements of the opponent’s zeppelin, and then leave enough units home to defend while creeping with the rest of your units. Making a single sorceress can also be good, because once the zeppelin comes into your base you can slow it, increasing your chances of killing it.
On maps where the lab gets crept early it can be a good idea to make a second arcane tower in your base. The second tower can help a lot against zeppelin pressure. Also note that zeppelins have a lot of value in combat, for picking up low health or surrounded units, so don’t be afraid to get one yourself for harass, and later for saving units in fights.
Tier 1 Expansion
If your opponent expands at tier 1 then you should pressure the expansion while it’s building. Don’t get drawn into fighting the opponent’s army. If you do this, you’ll be taking an even fight, which favors your opponent since they’re building an expansion behind it and can easily replace any lost units. Instead, you should try to kill the peasants building the expansion and cancel the arcane tower (water elementals do massive damage to towers while they’re constructing, so use your elementals to attack the tower). Make an arcane vault at home and run your units away one by one as they get reduced to low health. Eventually you’ll be pushed back, but as long as you didn’t lose too many footmen you should be able to heal up with a regeneration scroll and then resume pressuring.
You’ll want to go double sanctum for priests and sorceresses, which are both fantastic at applying pressure to an opponent that is still on tier 1 units. Getting a panda as your second hero can apply a lot of pressure because breath of fire is really strong against both footmen and militia. The panda is especially strong if the opponent wasn’t able to get any towers up.
If the opponent defends well in the early game and establishes the expansion with towers then you’re in a tough spot. One option is to go bloodmage second for flame strike, and then siege the opponent’s expansion using flamestrike to zone peasants off of the towers, preventing them from repairing, hopefully allowing you to break open the base’s defenses.
You can also try to counter expand but you should still apply pressure while expanding or the opponent will harass you and get even further ahead. The opponent’s harass can be hard to deal with because at this point in the game zeppelins are available and you won’t have any easy answers due to investing all your lumber into the expansion.
Example Games
Here’s an example game where both players creep level 3 and then skirmish.
This game demonstrates the aggressive early game style: Fortitude creeps one camp and then goes across the map, meanwhile Chaemiko opens with a big creep camp (the start of a level 3 creep route)
This game is a good example of all the different phases of the game: early game (creep level 3 then skirmish), mid game (priest breaker armies, expansions), and late game (tier 3 transition)
This game is on Last Refuge and shows how players commonly use the mercenary camp in human mirror
Pitlord second:
Base trade where both players creep level 3 and attack one another’s peasants: